We have many clients who express the desire to have more than one paragraph style within a paragraph in Microsoft Word. For example, someone wants to have a lead-in heading, where the heading is the first part of the paragraph and the rest of the paragraph is body text (i.e. not a heading).
Good news! We have a solution where you can mix styles within a paragraph in Microsoft Word for Windows (unfortunately for Mac users, this feature and our ribbon won’t work yet in Microsoft Word for MacOS).
Multiple styles within one paragraph in Word for Windows… accessibly!
The problem
We have many clients who express the desire to have more than one paragraph style within a paragraph in Microsoft Word. For example, someone wants to have a lead-in heading, where the heading is the first part of the paragraph and the rest of the paragraph is body text (i.e. not a heading). People assume it’s not possible, and so they either sadly give up on having a lead-in heading … or they at least give up on using a style for the lead-in heading (thus compromising both accessibility and effectiveness).
Good news (yes, this is indeed an example of what a lead-in heading looks like!): We have a solution where you can mix styles within a paragraph in Microsoft Word for Windows (unfortunately for Mac users, this feature and our ribbon won’t work yet in Microsoft Word for MacOS … the solution for Mac users is to use linked styles instead).
Here’s our solution for Word for Windows …
- If you have not already done so, install the latest Berman Accessibility Ribbon for Word (version 1.2) from http://www.davidberman.com/ribbon
- Don’t try this on an existing paragraph. Instead you need to create a new paragraph (that will contain your two styles).
- Type your heading, then position your cursor immediately following what you typed.
- In the Styles section of the ribbon in Microsoft Word for Windows (version 2010 or later), find the Style Separator button.

- Select the Style Separator button in the Accessibility ribbon (or Ctrl+Alt+Enter). (If you have the Show All indicator turned on, you will see a pilcrow (¶) appear … and this pilcrow confusingly looks like the pilcrows that are also used by Word to show you the ends of paragraphs).
- Type the rest of the paragraph.
- Highlight the heading portion and apply the appropriate Style (e.g., “Heading 2”) to it (using the Styles pane or Styles buttons, as always).
- Highlight the body text and apply the appropriate Style to it (using the Styles pane or Styles buttons, as always).
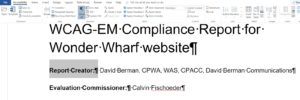
- You’re done. Here’s how it should look (our example has Show All on, and has the “Report Creator” Heading 2 and body text within the same paragraph):

What happens if you delete a Style Separator? The entire paragraph will take on the formatting of the text preceding the Separator.
What the Style Separator can do for you:
The Style Separator command isn’t just for lead-in headings. Here are other ways we make use of it:
- When a heading is burdensomely long, apply heading styles to only the beginning of it, so that the shorter version of the heading is what appears within the Table Of Contents and other navigation
- Include two headings in a single paragraph (for example, at the beginning of a document)
Can you think of anything I should add to this list?
Learn more at our next accessibility course! www.davidberman.com/next